In this Python TKinter article we are going to learn about How to Create GUI Window in Python TKinter, Python is very powerful programming language, and It ships with the built-in tkinter module. In only few lines of code (four, to be precise) we can build our first Python GUI, the IDE that we are using is Pycharm Community Edition IDE, first of all let’s talk about Python TKinter GUI Library, when it comes to GUI Development with Python you have different options, one of them are TKinter module.
What is Python TKinter ?
Python Tkinter is standard GUI (Graphical User Interface) library that comes with Python. it is builtin library and can be used to create desktop applications with graphical user interfaces.
Tkinter provides different widgets or graphical elements, including buttons, labels, text boxes, menus, canvas and many more, that you can use to create interactive GUIs. you can customize these widgets by changing their properties, such as size, color, font and style.
Tkinter is cross platform GUI toolkit, which means that the GUI applications you create with it can run on different operating systems, such as Windows, macOS and Linux. it is also easy to learn and use and this makes it popular choice for beginners who want to create simple desktop applications, TKinter is already packaged with Python, so you don’t need to install that.
Key Features of Python TKinter
As we already have mentioned that Python Tkinter is standard GUI (Graphical User Interface) library for creating desktop applications with consistent look and feel across multiple operating systems. these are some of the key features of Python Tkinter:
- Simple and Easy-to-Use: Python Tkinter is easy to learn and use, even for beginners. the simple syntax and widget hierarchy make it easy to create GUI applications quickly and easily.
- Cross-Platform: Tkinter is available on many platforms, including Windows, Mac OS X and Linux and this makes it popular choice for cross platform GUI development.
- Standard Library: Tkinter is standard Python library, which means it is included with every Python installation. there is no need to install any additional software or libraries to use Tkinter.
- Wide Range of Widgets: Tkinter provides different widgets, including buttons, labels, text boxes, radio buttons, check boxes, list boxes, drop-down menus, scroll bars, canvas and many more. and this makes it easy to create complex GUI applications with different UI elements.
- Customizable Look and Feel: Tkinter allows you to customize the look and feel of your application by changing the color, font and style of the widgets. you can also create custom widgets and themes to match your application’s branding.
- Event-Driven Programming: Tkinter is based on the event driven programming model, where the application waits for events to occur and then responds to them. this makes it easy to handle user interactions and create responsive applications.
- Integration with Other Libraries: Tkinter can be integrated with other Python libraries, such as Matplotlib for data visualization, and PIL (Python Imaging Library) for image processing. this makes it easy to extend the functionality of your application beyond the standard widgets.
We can say that Python Tkinter is powerful GUI library that offers simple and easy interface for creating cross platform gui desktop applications with different widgets and customization options.
This is the complete code for creating of Window in Python TKinter
|
1 2 3 4 5 6 7 8 9 10 11 12 13 14 15 16 |
import tkinter as tk # Create Instance Of Tkinter win = tk.Tk() win.title("Python GUI With TKinter") #win.configure(background='#4D4D4D') win.minsize(640, 400) win.wm_iconbitmap('icon.ico') # Prevent Window From Resizing #win.resizable(False, False) #Start GUI win.mainloop() |
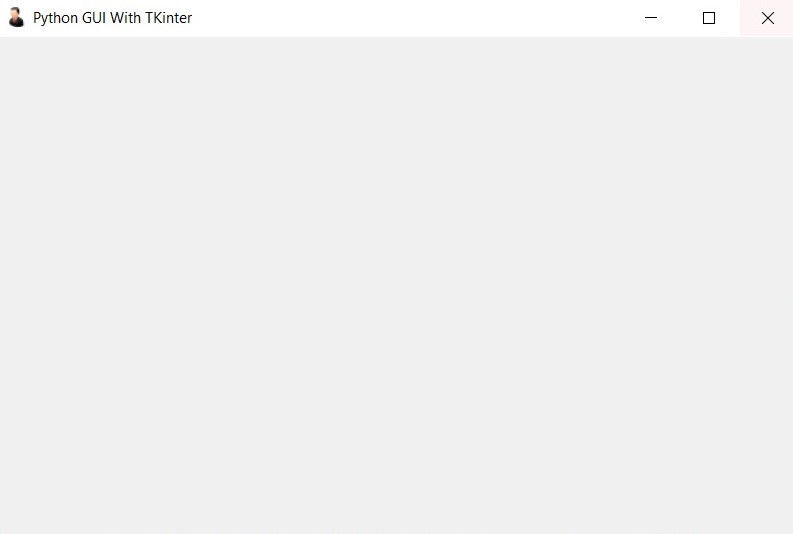
So at the top first we have imported tkinter, after that we have created a Root class this Root class extends from TK a built in class in TKinter module. after that we have created title, window size and also icon for our Window. at the end we create the object of our Root class and we start our loop for the GUI.The event loop ends when the user clicks the red X button or a widget that we have programmed to end our GUI. When the event loop ends, our GUI also ends.
Run you code and you will see this output

Now let’s create complex example and we want to add some widgets in out Python TKinter GUI Window.
|
1 2 3 4 5 6 7 8 9 10 11 12 13 14 15 16 17 18 19 20 21 22 23 24 25 26 27 28 29 30 31 32 33 34 35 36 37 38 39 40 41 42 43 44 45 46 47 48 49 50 51 52 53 54 55 56 57 58 59 60 61 62 63 64 65 66 |
import tkinter as tk class ExampleGUI(tk.Frame): def __init__(self, master=None): super().__init__(master) self.master = master self.master.title("Example GUI") # Create menu bar self.menu_bar = tk.Menu(self.master) self.file_menu = tk.Menu(self.menu_bar, tearoff=0) self.file_menu.add_command(label="New", command=self.new_file) self.file_menu.add_command(label="Open", command=self.open_file) self.file_menu.add_separator() self.file_menu.add_command(label="Exit", command=self.master.quit) self.menu_bar.add_cascade(label="File", menu=self.file_menu) self.help_menu = tk.Menu(self.menu_bar, tearoff=0) self.help_menu.add_command(label="About", command=self.show_about) self.menu_bar.add_cascade(label="Help", menu=self.help_menu) self.master.config(menu=self.menu_bar) # Create label self.label = tk.Label(self.master, text="Example GUI Window", font=("Helvetica", 20)) self.label.pack(pady=10) # Create text box self.text_box = tk.Text(self.master, height=10, width=50) self.text_box.pack(padx=10, pady=10) # Create buttons self.button_frame = tk.Frame(self.master) self.button_frame.pack(padx=10, pady=10) self.button1 = tk.Button(self.button_frame, text="Button 1", command=self.on_button1_click) self.button1.pack(side="left", padx=5) self.button2 = tk.Button(self.button_frame, text="Button 2", command=self.on_button2_click) self.button2.pack(side="left", padx=5) self.button3 = tk.Button(self.button_frame, text="Button 3", command=self.on_button3_click) self.button3.pack(side="left", padx=5) def new_file(self): print("New file created") def open_file(self): print("File opened") def show_about(self): print("About window opened") def on_button1_click(self): print("Button 1 clicked") def on_button2_click(self): print("Button 2 clicked") def on_button3_click(self): print("Button 3 clicked") # Create root window and ExampleGUI widget root = tk.Tk() gui = ExampleGUI(master=root) gui.pack() # Start main event loop root.mainloop() |
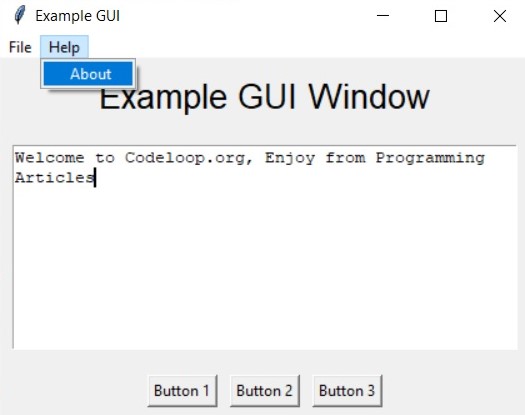
This example creates custom Python Tkinter widget called ExampleGUI that extends tk.Frame class. widget contains menu bar with two menus (File and Help), label, text box and three buttons.
To create menu bar, example creates two menus (File and Help) using the tk.Menu class and adds commands to them using the add_command method. menu bar is then added to the root window using the config method.
label and text box are created using the tk.Label and tk.Text classes, respectively. label has custom font size of 20 and the text box has a height of 10 and a width of 50.
and finally three buttons are created using the tk.Button class and placed in tk.Frame using the pack method. each button has custom command function that prints a message to the console when clicked. note that the widget is first packed
Run your code and this is the output

Also you can check more Python articles in the below links
- Complete PyQt5 GUI Development Course
- Python TKinter GUI Development
- Psyide2 GUI Development
- wxPython GUI Development
Also you can watch the complete video for this article
Subscribe and Get Free Video Courses & Articles in your Email