In this article we want to learn How to Build an Application using Python, so first of all let’s talk about Python Programming language.
What is Python?
Python is one of the popular programming languages, Python is so simple and it has easy syntax, by this reason it is one of the best choice for developing different types of applications, from simple scripts to complex web applications and desktop software. In this guide, we’ll walk you through the process of building your first application with Python, covering everything from setting up your development environment, creating console based application to adding graphical interface for python application.
Choosing a Project Idea:
Before diving into coding, we need to have a clear idea of what kind of application we want to build. these are some project ideas for beginners, in this article we are going to build a simple weather app using Python.
- To-do list application
- Weather forecast app
- Simple game (e.g., tic-tac-toe)
- Calculator
- Text-based adventure game
How to Install Python?
Before starting our coding, make sure that you have Python installed on your system. You can download and install Python from the official website (python.org). Consider using a virtual environment to manage dependencies and isolate your project’s environment from other Python projects on your system.
Writing Your Code for Python Application
After that you have a clear plan, now start writing your application code. Break down your project into smaller modules or functions, each responsible for a specific task or feature. Write clean, readable code and follow best practices, such as using meaningful variable names and documenting your code with comments.
How to Build an Application using Python?
So now in our case we are going to build a simple weather with Python.
|
1 2 3 4 5 6 7 8 9 10 11 12 13 14 15 16 17 18 19 20 21 22 23 24 25 26 27 28 29 30 |
import requests def get_weather(city_name, api_key): url = f"http://api.openweathermap.org/data/2.5/weather?q={city_name}&appid={api_key}&units=metric" response = requests.get(url) data = response.json() if response.status_code == 200: # Extract relevant weather information weather_description = data['weather'][0]['description'] temperature = data['main']['temp'] humidity = data['main']['humidity'] wind_speed = data['wind']['speed'] # Print weather information print(f"Weather in {city_name}:") print(f"Description: {weather_description}") print(f"Temperature: {temperature}°C") print(f"Humidity: {humidity}%") print(f"Wind Speed: {wind_speed} m/s") else: print("Failed to retrieve weather data.") if __name__ == "__main__": # Replace 'YOUR_API_KEY' with your actual OpenWeatherMap API key api_key = 'Your_API-Key' city_name = input("Enter city name: ") get_weather(city_name, api_key) |
Before running this code, you need to sign up for an account on the OpenWeatherMap website to obtain an API key. after that you have the API key, add your actual API key in the code.
Basically this code prompts the user to enter a city name and after that fetches the current weather data for that city using OpenWeatherMap API. It prints out the weather description, temperature, humidity and wind speed.
Remember that this is just a basic example to get you started. You can extend and customize this code further by adding error handling, more detailed weather information.
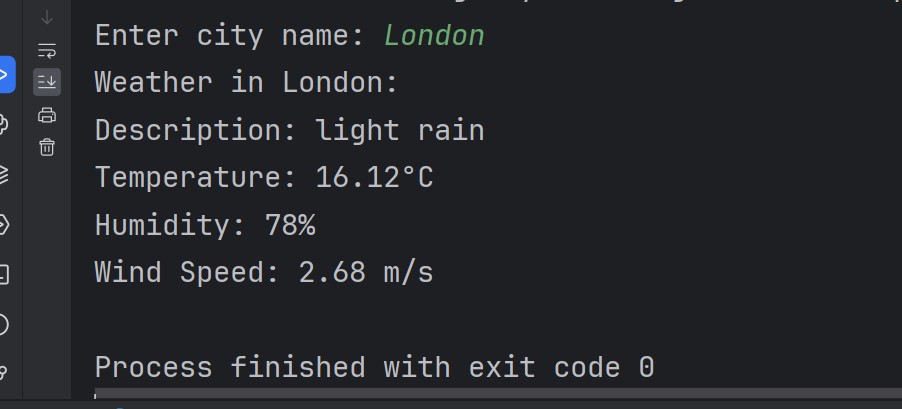
Run the code and enter a city, this will be the result
OK so now we have our Python Application, but it is console based Python application, we want to create a GUI or Graphical User Interface for this application, for his purpose we are going to PyQt6 library.
What is PyQt6?
PyQt6 is a set of Python bindings for Qt framework, and it is developed by Riverbank Computing. Qt is cross-platform application framework, and it is used for developing desktop, mobile and embedded applications. PyQt6 allows developers to create graphical user interfaces (GUIs) for their Python applications using Qt library.
PyQt6 Installation
First of all we need to install PyQt6, and we can use pip for the installation, open your command prompt or terminal and write this command.
|
1 |
pip install PyQt6 |
Now let’s create our Python weather application example with PyQt6
|
1 2 3 4 5 6 7 8 9 10 11 12 13 14 15 16 17 18 19 20 21 22 23 24 25 26 27 28 29 30 31 32 33 34 35 36 37 38 39 40 41 42 43 44 45 46 47 48 49 50 51 52 53 54 55 56 57 58 59 60 61 62 63 64 65 66 67 68 69 70 71 72 73 74 75 |
import sys import requests from PyQt6.QtWidgets import QApplication, QWidget, QVBoxLayout, QLabel, QLineEdit, QPushButton, QMessageBox from PyQt6.QtGui import QIcon # Function fetch weather data from OpenWeatherMap API def get_weather(city_name, api_key): # Construct the API URL url = f"http://api.openweathermap.org/data/2.5/weather?q={city_name}&appid={api_key}&units=metric" # Send GET request to the API response = requests.get(url) # Parse JSON response data = response.json() # Check if the request was successful if response.status_code == 200: # Extract relevant weather information from the response weather_description = data['weather'][0]['description'] temperature = data['main']['temp'] humidity = data['main']['humidity'] wind_speed = data['wind']['speed'] # Format the weather information as a string return f"Description: {weather_description}\nTemperature: {temperature}°C\nHumidity: {humidity}%\nWind Speed: {wind_speed} m/s" else: # Return an error message if the request failed return "Failed to retrieve weather data." # Main application window class WeatherApp(QWidget): def __init__(self): super().__init__() # Set window title and icon self.setWindowTitle("Codeloop.org - Weather App") self.setWindowIcon(QIcon('codeloop.png')) # Create vertical layout layout = QVBoxLayout() # Create line edit widget for entering city name self.city_input = QLineEdit() layout.addWidget(self.city_input) # Create button for fetching weather self.fetch_button = QPushButton("Fetch Weather") self.fetch_button.clicked.connect(self.fetch_weather) layout.addWidget(self.fetch_button) # Create label for displaying weather information self.weather_label = QLabel() layout.addWidget(self.weather_label) # Set layout for the window self.setLayout(layout) # Method to fetch weather information def fetch_weather(self): # Get the city name entered by the user city_name = self.city_input.text() # OpenWeatherMap API key (Replace with your actual API key) api_key = 'YOUR API KEY' # Fetch weather information for the specified city weather_info = get_weather(city_name, api_key) # Update the label with the weather information self.weather_label.setText(weather_info) # Entry point of the application if __name__ == "__main__": # Create the application object app = QApplication(sys.argv) # Create an instance of the WeatherApp class window = WeatherApp() # Show the main window window.show() # Run the application event loop sys.exit(app.exec()) |
Replace ‘YOUR_API_KEY’ with your actual OpenWeatherMap API key.
This PyQt6 application creates a window with a QLineEdit widget for entering the city name, also QPushButton for fetching weather data, and QLabel for displaying the weather information. When the user clicks the button, it triggers fetch_weather method, which fetches the weather data for the entered city and updates the QLabel with the weather information.
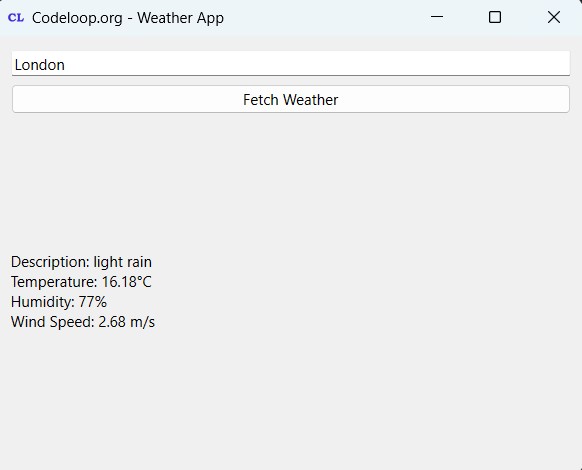
Run the code, enter the city name and this will be the result
Subscribe and Get Free Video Courses & Articles in your Email