In this Python TKinter article iam going to show you How To Add Widgets In TKinter TabWidget.
so before this you can check my previous articles on Python TKinter GUI Development.
Also you can read more articles on Python GUI Development
1: PyQt5 GUI Development Tutorials
2: Pyside2 GUI Development Tutorials
3: wxPython GUI Development Tutorials
4: Kivy GUI Development Tutorials
This is the complete source code for Adding Widgets In Python TKinter Tab Controls.
|
1 2 3 4 5 6 7 8 9 10 11 12 13 14 15 16 17 18 19 20 21 22 23 24 25 26 27 28 29 30 31 32 33 34 35 36 37 38 39 40 41 42 43 44 45 46 47 48 49 50 51 52 53 54 55 56 57 58 59 60 61 |
from tkinter import * from tkinter import ttk class App(Tk): def __init__(self): super(App, self).__init__() self.title("Tkinter Tab Widgets") self.minsize(600,400) self.wm_iconbitmap("icon.ico") tabControl = ttk.Notebook(self) self.tab1 = ttk.Frame(tabControl) tabControl.add(self.tab1, text = "Tab 1") self.tab2 = ttk.Frame(tabControl) tabControl.add(self.tab2, text = "Tab 2") tabControl.pack(expand = 1, fill = "both") self.widgets() def widgets(self): labelFrame = LabelFrame(self.tab1, text = "First Tab") labelFrame.grid(column = 0, row = 0, padx = 8, pady = 4) label = Label(labelFrame, text = "Enter Your Name:") label.grid(column = 0, row = 0, sticky = 'W') textEdit = Entry(labelFrame, width = 20) textEdit.grid(column = 1, row = 0) label2 = Label(labelFrame, text = "Enter Your Password:") label2.grid(column = 0, row = 1) textEdit = Entry(labelFrame, width = 20) textEdit.grid(column= 1, row = 1) labelFrame2 = LabelFrame(self.tab2, text = "Second Tab") labelFrame2.grid(column = 0, row = 0, padx = 8, pady = 4) label = Label(labelFrame2, text="Enter Your Name:") label.grid(column=0, row=0, sticky='W') textEdit = Entry(labelFrame2, width=20) textEdit.grid(column=1, row=0) label2 = Label(labelFrame2, text="Enter Your Password:") label2.grid(column=0, row=1) textEdit = Entry(labelFrame2, width=20) textEdit.grid(column=1, row=1) app = App() app.mainloop() |
These are the imports that we need for this article, basically it is tkinter library, also we are
going to import ttk from tkinter.
|
1 2 |
from tkinter import * from tkinter import ttk |
This our main class that extends from Tk , in this class we add two tabs. also we call our
widgets() method in this class. you need to add window title, icon and size in this class.
|
1 2 3 4 5 6 7 8 9 10 11 12 13 14 15 16 17 18 |
class App(Tk): def __init__(self): super(App, self).__init__() self.title("Tkinter Tab Widgets") self.minsize(600,400) self.wm_iconbitmap("icon.ico") tabControl = ttk.Notebook(self) self.tab1 = ttk.Frame(tabControl) tabControl.add(self.tab1, text = "Tab 1") self.tab2 = ttk.Frame(tabControl) tabControl.add(self.tab2, text = "Tab 2") tabControl.pack(expand = 1, fill = "both") self.widgets() |
This is the method that we are going to add our widgets to tab control. first we have created a
label frame and we have added the label frame to the grid layout. also we have created some
labels with text edits, because we want to add those widgets in our tabs.
|
1 2 3 4 5 6 7 8 9 10 11 12 13 14 15 16 17 18 19 20 21 22 23 24 |
def widgets(self): labelFrame = LabelFrame(self.tab1, text = "First Tab") labelFrame.grid(column = 0, row = 0, padx = 8, pady = 4) label = Label(labelFrame, text = "Enter Your Name:") label.grid(column = 0, row = 0, sticky = 'W') textEdit = Entry(labelFrame, width = 20) textEdit.grid(column = 1, row = 0) label2 = Label(labelFrame, text = "Enter Your Password:") label2.grid(column = 0, row = 1) textEdit = Entry(labelFrame, width = 20) textEdit.grid(column= 1, row = 1) labelFrame2 = LabelFrame(self.tab2, text = "Second Tab") labelFrame2.grid(column = 0, row = 0, padx = 8, pady = 4) label = Label(labelFrame2, text="Enter Your Name:") label.grid(column=0, row=0, sticky='W') textEdit = Entry(labelFrame2, width=20) textEdit.grid(column=1, row=0) label2 = Label(labelFrame2, text="Enter Your Password:") label2.grid(column=0, row=1) textEdit = Entry(labelFrame2, width=20) textEdit.grid(column=1, row=1) |
Run the complete code and this will be the result
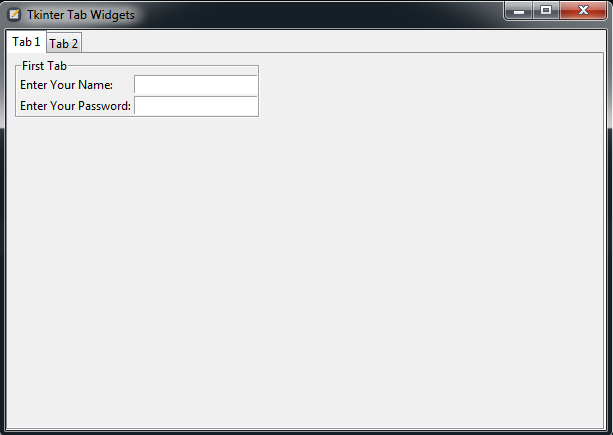
How To Add Widgets In Python TKinter TabWidget
Also you can watch the complete video tutorial for this article
Subscribe and Get Free Video Courses & Articles in your Email
