In this Flask Tutorial we are going to learn about Flask SQLAlchemy with MySQL database, i will show you that how you can connect your Flask application to Mysql database using Flask SQLAlchemy, so first of all let’s talk about Flask.
What is Python Flask ?
In this Flask Tutorial, first let’s talk about Flask, so Python Flask is lightweight web framework that allows developers to build web applications in Python. Flask provides simple and flexible way to create web applications without the need for complex configuration or boilerplate code. it includes built in development server and supports different extensions and plugins for adding features such as authentication, database integration and templating engines.
Some of the key features of Flask include:
- Lightweight and flexible: Flask is designed to be simple and lightweight and it allows developers to build web applications quickly and easily.
- Routing and URL handling: Flask provides simple and flexible way to define routes and handle HTTP requests and responses.
- Templating engine: Flask supports several templating engines, which allow developers to create dynamic and interactive web pages.
- Built-in development server: Flask includes built in development server, which makes it easy to test and debug applications locally.
- Extensions and plugins: Flask supports different extensions and plugins and it provides additional features and functionality such as database integration, authentication and caching.
Flask is mostly used in web development for creating simple and scalable web applications, RESTful APIs and microservices. It is often used in combination with other Python libraries and tools, such as SQLAlchemy for database integration and Jinja2 for templating.
What is SQLAlchemy ?
SQLAlchemy is the Python SQL toolkit and Object Relational Mapper that gives application developers the full power and flexibility of SQL. It provides a full suite of well known enterprise-level persistence patterns, designed for efficient and high-performing database access, adapted into a simple and Pythonic domain language.
What is Flask-SQLAlchemy ?
Flask-SQLAlchemy is an extension for Flask that adds support for SQLAlchemy to your application. It aims to simplify using SQLAlchemy with Flask by providing useful defaults and extra helpers that make it easier to accomplish common tasks. See the SQLAlchemy documentation to learn how to work with the ORM in depth. The following documentation is a brief overview of the most common tasks, as well as the features specific to Flask-SQLAlchemy.
Also if you are interested in Django, you can check this link Django Web Development Tutorials.
How to Install Flask-SQLAlchemy?
You can simply install Flask-SQLAlchemy using pip command.
|
1 |
pip install Flask-SQLAlchemy |
So now after installation you need to create database, we are using Mysql database. for this you need to download and install Wamp Server. create a database in the Wamp Server, iam going to give flaskcodeloop for the database name, but you can give the name according to your choice. right now we don’t have any table in our database, we will create this using Flask SQLAlchemy. We are going to use codes from our previous articles.
How to Create SQLAlchemy with MySQL in Flask?
This is our app.py and we have added our SQLAlchmey and database configuration.
|
1 2 3 4 5 6 7 8 9 10 11 12 13 14 15 16 17 18 19 20 21 22 23 24 25 26 27 28 29 30 31 32 33 34 35 36 37 38 39 40 41 42 43 44 45 46 47 48 49 50 51 52 53 54 55 56 57 58 59 60 61 62 63 64 65 66 67 68 |
from flask import Flask, render_template, flash, request, redirect, url_for from forms import LoginForm from flask_sqlalchemy import SQLAlchemy #create the object of Flask app = Flask(__name__) app.config['SECRET_KEY'] = 'hardsecretkey' #SqlAlchemy Database Configuration With Mysql app.config['SQLALCHEMY_DATABASE_URI'] = 'mysql://root:''@localhost/flaskcodeloop' app.config['SQLALCHEMY_TRACK_MODIFICATIONS'] = False db = SQLAlchemy(app) #our model class UserInfo(db.Model): id = db.Column(db.Integer, primary_key = True) username = db.Column(db.String(100), unique = True) password = db.Column(db.String(100)) def __init__(self, username, password): self.username = username self.password = password #creating our routes @app.route('/') def index(): return render_template('index.html') #login route @app.route('/login' , methods = ['GET', 'POST']) def Login(): form = LoginForm() if form.validate_on_submit(): if request.form['username'] != 'codeloop' or request.form['password'] != '12345': flash("Invalid Credentials, Please Try Again") else: return redirect(url_for('index')) return render_template('login.html', form = form) #run flask app if __name__ == "__main__": app.run(debug=True) |
In the above code this is for SQLAlchemy.
|
1 2 3 4 5 6 |
#SqlAlchemy Database Configuration With Mysql app.config['SQLALCHEMY_DATABASE_URI'] = 'mysql://root:''@localhost/flaskcodeloop' app.config['SQLALCHEMY_TRACK_MODIFICATIONS'] = False db = SQLAlchemy(app) |
And this is our database model class, it is just a simple model with three fields, id, username and password.
|
1 2 3 4 5 6 7 8 9 |
class UserInfo(db.Model): id = db.Column(db.Integer, primary_key = True) username = db.Column(db.String(100), unique = True) password = db.Column(db.String(100)) def __init__(self, username, password): self.username = username self.password = password |
We have created our database model in our app.py, now we need to add this model in our Mysql Database, for this you need to open your Python terminal in Pycharm IDE. first we need to import our db from app, and after that we create our tables in the database.
|
1 2 |
>>> from app import db >>> db.create_all() |
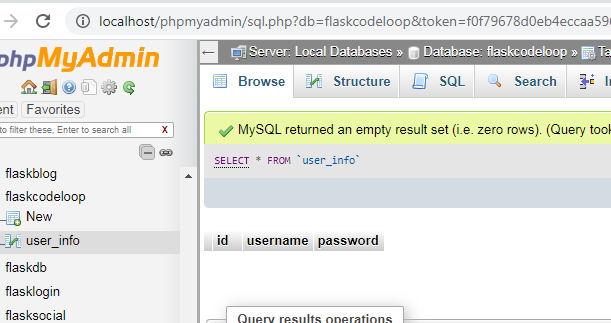
If you check your flaskcodeloop database, you can see that we have our table with the data.
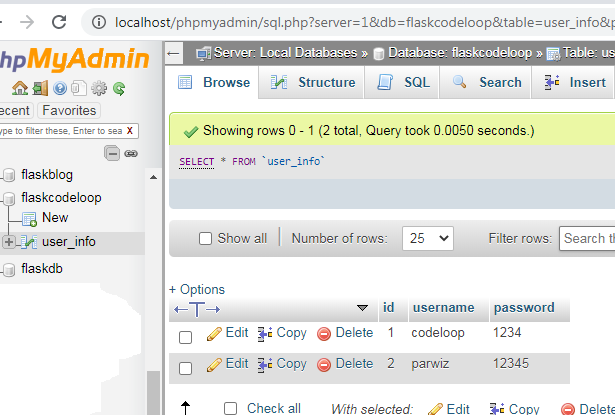
Now let’s add some data to our database. basically we are going to add just two UserInfo to our database table.
|
1 2 3 4 5 6 7 |
>>> from app import db >>> from app import UserInfo >>> u = UserInfo('codeloop',1234) >>> u1 = UserInfo('parwiz', 12345) >>> db.session.add(u) >>> db.session.add(u1) >>> db.session.commit() |
Check your database table, you will have two UserInfo data.
Selecting Data in Flask SQLAlchemy
Also you can select or retrieve the data from your Mysql Database, so now let’s open our python terminal in Pycharm IDE, and retrieve our data.
|
1 2 3 4 5 6 |
>>> user_data = UserInfo.query.all() >>> for user in user_data: ... print(user.username) ... codeloop parwiz |
Updating Data in Flask SQLAlchemy
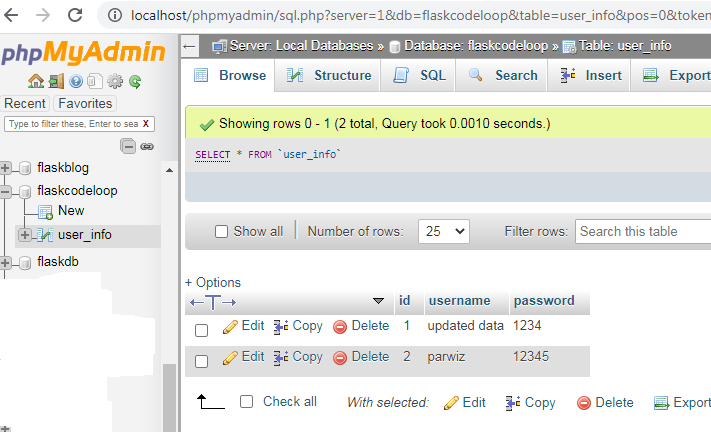
updating data is also an easy task with Flask SQLAlchemy, let’s update our first record in the database.
|
1 2 3 |
>>> update = UserInfo.query.filter_by(id=1).first() >>> update.username = 'updated data' >>> db.session.commit() |
Now check your Mysql database, the first record is updated.
Deleting Data in Flask SQLAlchemy
Also you can delete data using this commands in Flask SQLAlchemy.
|
1 2 |
>>> deleted = UserInfo.query.filter_by(id=1).first() >>> db.session.delete(deleted) |
OK now we have done some basic operations in our database using Flask SQLAlchemy, it was just using python terminal, we will do that practically in the next articles. also these are the html files for the app.py file.
This is our base.html, we have already talked about creating templates in Flask, you can read this article Introduction to Flask Templates. you need to just create templates folder in your working directory.
templates/base.html
|
1 2 3 4 5 6 7 8 9 10 11 12 13 14 15 16 17 18 19 20 21 22 23 24 25 26 27 28 29 30 31 32 33 34 35 36 37 38 39 40 41 42 43 44 45 46 47 48 49 50 51 52 53 54 55 56 57 58 59 60 61 62 63 64 65 |
<!DOCTYPE html> <html lang="en"> <head> <meta charset="UTF-8"> <title>{% block title %} {% endblock %}</title> <!-- CSS Bootstrap CDN Link --> <link rel="stylesheet" href="https://stackpath.bootstrapcdn.com/bootstrap/4.5.0/css/bootstrap.min.css" integrity="sha384-9aIt2nRpC12Uk9gS9baDl411NQApFmC26EwAOH8WgZl5MYYxFfc+NcPb1dKGj7Sk" crossorigin="anonymous"> </head> <body> <nav class="navbar navbar-expand-lg navbar-dark bg-dark"> <div class="container"> <a class="navbar-brand" href="{{url_for('index')}}">CodeLoop</a> <button class="navbar-toggler" type="button" data-toggle="collapse" data-target="#navbarSupportedContent" aria-controls="navbarSupportedContent" aria-expanded="false" aria-label="Toggle navigation"> <span class="navbar-toggler-icon"></span> </button> <div class="collapse navbar-collapse" id="navbarSupportedContent"> <ul class="navbar-nav mr-auto"> <li class="nav-item active"> <a class="nav-link" href="{{url_for('index')}}">Home <span class="sr-only">(current)</span></a> </li> <li class="nav-item"> <a class="nav-link" href="#">Logout</a> </li> </ul> <form class="form-inline my-2 my-lg-0"> <input class="form-control mr-sm-2" type="search" placeholder="Search" aria-label="Search"> <button class="btn btn-outline-success my-2 my-sm-0" type="submit">Search</button> </form> </div> </div> <a href="{{url_for('Login')}}"><button class="btn btn-success navbar-btn">Login</button> </a> <a href=""><button class="btn btn-success navbar-btn">Signup</button> </a> </nav> <!-- JS, Popper.js, and jQuery --> <script src="https://code.jquery.com/jquery-3.5.1.slim.min.js" integrity="sha384-DfXdz2htPH0lsSSs5nCTpuj/zy4C+OGpamoFVy38MVBnE+IbbVYUew+OrCXaRkfj" crossorigin="anonymous"></script> <script src="https://cdn.jsdelivr.net/npm/popper.js@1.16.0/dist/umd/popper.min.js" integrity="sha384-Q6E9RHvbIyZFJoft+2mJbHaEWldlvI9IOYy5n3zV9zzTtmI3UksdQRVvoxMfooAo" crossorigin="anonymous"></script> <script src="https://stackpath.bootstrapcdn.com/bootstrap/4.5.0/js/bootstrap.min.js" integrity="sha384-OgVRvuATP1z7JjHLkuOU7Xw704+h835Lr+6QL9UvYjZE3Ipu6Tp75j7Bh/kR0JKI" crossorigin="anonymous"></script> {% block body %} {% endblock %} </body> </html> |
Our login.html with flash message.
templates/login.html
|
1 2 3 4 5 6 7 8 9 10 11 12 13 14 15 16 17 18 19 20 21 22 23 24 25 26 27 28 29 30 31 32 33 34 35 36 37 38 39 40 41 42 43 44 45 46 47 48 49 50 51 52 53 54 55 56 57 58 59 60 61 62 63 64 65 66 67 68 69 70 71 72 73 74 75 76 77 78 79 80 81 82 83 84 85 86 87 88 89 90 91 |
{% extends 'base.html' %} {% block title %} Home {% endblock %} {% block body %} <div class="container"> <h1>Home Page - Welcome to codeloop.org</h1> <h3>Tutorial Number 11 </h3> <br> <br> <hr> {% with messages = get_flashed_messages() %} {% if messages %} {% for message in messages %} <div class="alert alert-success alert-dismissable" role="alert"> <button type="button" class="close" data-dismiss="alert" aria-label="close"> <span aria-hidden="true">X</span> </button> {{message}} </div> {% endfor %} {% endif %} {% endwith %} <h1>Please Login</h1> <form action="" method="post" novalidate> {{form.csrf_token}} <p> {{form.username.label}} {{form.username(size=32)}} {% for error in form.username.errors %} <span style="color:red;"> {{error}} </span> {% endfor %} </p> <p> {{form.password.label}} {{form.password(size=32)}} {% for error in form.password.errors %} <span style="color:red;"> {{error}} </span> {% endfor %} </p> <p> <input type="submit" value="Login" class="btn btn-success"> </p> </form> </div> {% endblock %} |
And this is our index.html file.
templates/index.html
|
1 2 3 4 5 6 7 8 9 10 11 12 13 14 15 16 17 18 19 20 21 22 23 |
{% extends 'base.html' %} {% block title %} Home {% endblock %} {% block body %} <div class="container"> <h1>Home Page - Welcome to codeloop.org</h1> <h3>Tutorial Number 11 </h3> <p> In this tutorial we are going to talk about Flask SQLAlchemy. </p> </div> {% endblock %} |
This is forms.py file.
|
1 2 3 4 5 6 7 8 9 10 |
from flask_wtf import FlaskForm from wtforms import StringField, PasswordField from wtforms.validators import InputRequired class LoginForm(FlaskForm): username = StringField('Username', validators=[InputRequired()]) password = PasswordField('Password', validators=[InputRequired()]) |
FAQs:
How to connect MySQL with Flask using SQLAlchemy?
For connecting MySQL with Flask using SQLAlchemy, follow these steps:
- Install SQLAlchemy and Flask-MySQL package, you can use pip like this for the installation: pip install SQLAlchemy Flask-MySQL
- In your Flask application, import SQLAlchemy and create an instance of it:
|
1 2 3 4 5 6 |
from flask import Flask from flask_sqlalchemy import SQLAlchemy app = Flask(__name__) app.config['SQLALCHEMY_DATABASE_URI'] = 'mysql://username:password@hostname/database_name' db = SQLAlchemy(app) |
Can SQLAlchemy be used with MySQL?
Yes, SQLAlchemy can be used with MySQL. SQLAlchemy is a popular SQL toolkit and Object-Relational Mapping (ORM) library for Python, and it offers compatibility with different database systems including MySQL, PostgreSQL, SQLite and many more.
How do you use SQLAlchemy in Flask?
For using SQLAlchemy in Flask, follow these steps:
- Install Flask-SQLAlchemy package, you can use pip for the installation: pip install Flask-SQLAlchemy
- Import SQLAlchemy and create an instance of it in your Flask application:
How to create a database with Flask?
For creating a database with Flask, follow these steps:
- Install Flask-SQLAlchemy package if not already installed: pip install Flask-SQLAlchemy
- Import SQLAlchemy and create an instance of it in your Flask application:
|
1 2 3 4 5 6 |
from flask import Flask from flask_sqlalchemy import SQLAlchemy app = Flask(__name__) app.config['SQLALCHEMY_DATABASE_URI'] = 'sqlite:///your_database.db' db = SQLAlchemy(app) |
- Replace ‘sqlite:///your_database.db’ with the appropriate database URI for your chosen database system.
- Define your models using SQLAlchemy’s ORM.
- Run the following Flask command in your terminal to create the initial database:
|
1 2 3 |
flask db init flask db migrate -m "Initial migration" flask db upgrade |
This will create the necessary migration files and apply them to create the database structure.
Subscribe and Get Free Video Courses & Articles in your Email
tanQ very very good
How do I resolve:
from forms import LoginForm
ModuleNotFoundError: No module named ‘forms’