This is our fourth article in Django, in this article we are going to talk about Django Template Introduction with Example. also you can read the other articles on Django in these links.
Flask Web Development Tutorials
1: Flask CRUD Application with SQLAlchemy
2: Flask Creating News Web Application
3: Flask Creating REST API with Marshmallow
Python GUI Development Tutorials
1: PyQt5 GUI Development Tutorials
2: Pyside2 GUI Development Tutorials
3: wxPython GUI Development Tutorials
4: Kivy GUI Development Tutorials
5: TKinter GUI Development Tutorials
What are Templates in Django ?
Django templates define the layout and final formatting sent to end users after a view method is finished processing a request. being a web framework, Django needs a convenient way to generate HTML dynamically. The most common approach relies on templates. a template contains the static parts of the desired HTML output as well as some special syntax describing how dynamic content will be inserted. there are different templates engines that you can use in Django. Django ships built-in back-ends for its own template system, creatively called the Django template language (DTL), and for the popular alternative Jinja2. backends for other template languages may be available from third-parties.
What is Jinja ?
Jinja is a modern and designer-friendly templating language for Python, modeled after Django’s templates. It is fast, widely used and secure with the optional sandboxed template execution environment.
OK first of all you need to create project in Django, we have already covered the creation of the Django project in our previous article, i have already added the link at the top. but you can use this command for creating of Django Project.
|
1 |
django-admin startproject MyProject |
After creation of the Django Project, you need to migrate your Django Project.
|
1 2 |
cd MyProject python manage.py migrate |
OK now for creating of the App, you need to change directory to the created Django Project,
in my case it is MyProject.
|
1 |
cd MyProject |
Also we are going to create an App, for App introduction you can check my previous article in the above link, we have already created an app at name of contact in the previous article Django Apps & URL Routing, but you can use this commands for creating of App in Django. make sure that you have changed the directory to your Django Project.
|
1 |
python manage.py startapp contact |
Also you need to add your newly created app in the Django settings.py INSTALLED_APPS.
|
1 2 3 4 5 6 7 8 9 |
INSTALLED_APPS = [ 'django.contrib.admin', 'django.contrib.auth', 'django.contrib.contenttypes', 'django.contrib.sessions', 'django.contrib.messages', 'django.contrib.staticfiles', 'contact', ] |
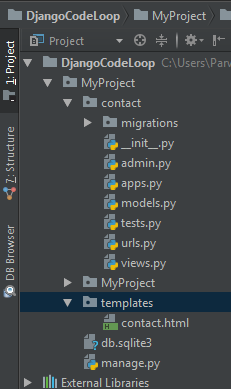
So now you need to create a new folder in your project at name of templates, and we are going to add an html file called contact.html. in the html file , we are going to just add a simple text like this.
|
1 2 3 4 5 6 7 8 9 10 |
<!DOCTYPE html> <html lang="en"> <head> <meta charset="UTF-8"> <title>Contact</title> </head> <body> <h1>Welcome to codeloop.org , this is our contact page</h1> </body> </html> |
This is our project structure

After this we need to open our settings.py, because right now our Django Project does not know about our templates in the Django Project Structure, we need to tell django about this folder, so by this reason open your settings.py. and add templates in the DIRS section.
|
1 2 3 4 5 |
TEMPLATES = [ { 'BACKEND': 'django.template.backends.django.DjangoTemplates', 'DIRS': ["templates"], #added in here templates 'APP_DIRS': True, |
So now open your views.py, and create a view function, we have already covered this in the article of Django Apps & URL Routing , but you can add this code in your views.py, basically it is just a simple view that returns our contact.html file. before this we have just used HttpsResponse for returning our text, but this time because we are using html file, so we need to use render method.
|
1 2 3 4 5 6 |
from django.shortcuts import render def contact(request): return render(request, "contact.html") |
the render takes three parameters, the request, our html file name and the third one is the context variable, that we will cover that in the next articles.
And this is our urls.py file in our contact app, we have already included this file in our MyProject urls.py file, for more information you can check this article Django Apps & URL Routing
|
1 2 3 4 5 6 7 |
from django.urls import path from .views import contact urlpatterns = [ path('contact/', contact, name = 'contact') ] |
OK now run the project.
|
1 |
python manage.py runserver |
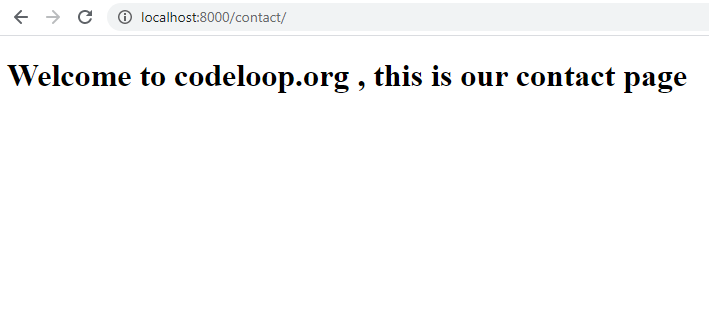
And go to http://localhost:8000/contact/, this will be the result, and we have
successfully rendered our html file.

Subscribe and Get Free Video Courses & Articles in your Email