In this Android Studio article iam going to show you Creating TextView Label in Android,
so a TextViewLabel is simple TextView that is styled like a label. for doing this we need to
use another library.
Learn How to Load Image from URL in Android Studio.
Also you can read more android development articles
1: Android Development Articles
So first of all you need to open your Android Studio and create a New Project, after that choose
your API Level,for this article iam using API Level 22.
After creating of the project in Android Studio you need to open build.gradle(Module:app) and
in the dependencies section you need to add the library like this.
|
1 |
implementation 'com.github.everseat:TextViewLabel:0.1' |
also you need to add the JitPack repo to your root build.gradle file.
after adding you need to sync your Android project.
|
1 2 3 4 5 6 |
allprojects { repositories { ... maven { url "https://jitpack.io" } } } |
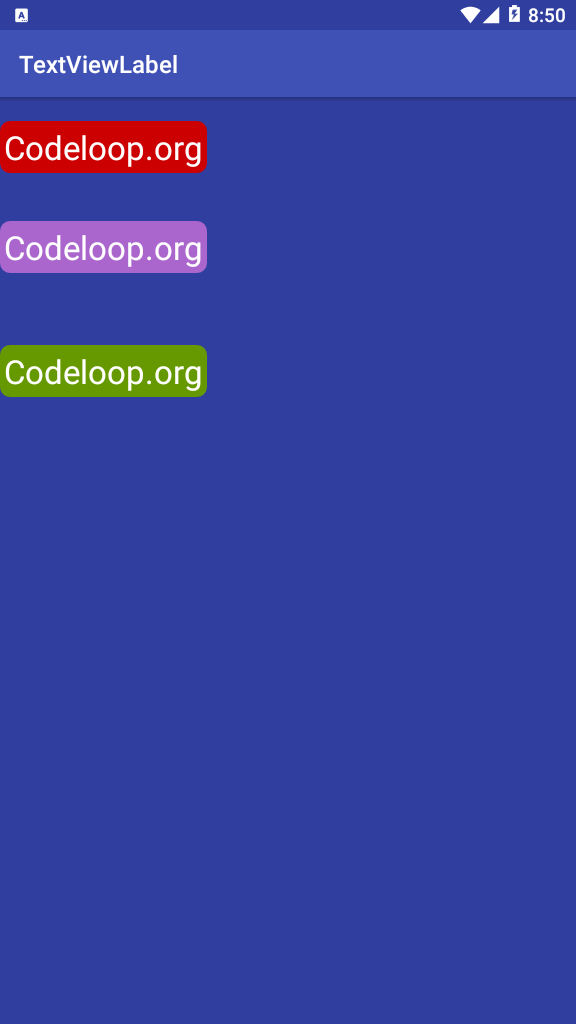
Now open your activity_main.xml layout, and you need to add the library widget in their,
basically i have added three TextViewLabel in my layout. also iam using LinearLayout for this
tutorial, make sure that after adding LinearLayout give the orientation vertical.
|
1 2 3 4 5 6 7 8 9 10 11 12 13 14 15 16 17 18 19 20 21 22 23 24 25 26 27 28 29 30 31 32 33 34 35 36 37 38 39 40 41 |
<?xml version="1.0" encoding="utf-8"?> <LinearLayout xmlns:android="http://schemas.android.com/apk/res/android" xmlns:app="http://schemas.android.com/apk/res-auto" xmlns:tools="http://schemas.android.com/tools" android:orientation="vertical" android:layout_width="match_parent" android:layout_height="match_parent" tools:context="org.codeloop.textviewlabel.MainActivity"> <com.everseat.textviewlabel.TextViewLabel android:layout_width="wrap_content" android:layout_height="wrap_content" android:layout_marginTop="20dp" android:text="Codeloop.org" android:textSize="24sp" android:textColor="#FFF" app:labelColor="@android:color/holo_red_dark"/> <com.everseat.textviewlabel.TextViewLabel android:layout_width="wrap_content" android:layout_height="wrap_content" android:layout_marginTop="40dp" android:text="Codeloop.org" android:textSize="24sp" android:textColor="#FFF" app:labelColor="@android:color/holo_purple"/> <com.everseat.textviewlabel.TextViewLabel android:layout_width="wrap_content" android:layout_height="wrap_content" android:layout_marginTop="60dp" android:text="Codeloop.org" android:textSize="24sp" android:textColor="#FFF" app:labelColor="@android:color/holo_green_dark"/> </LinearLayout> |
You don’t need to bring changes in your Mainactivity.java file, we have just added the widget in
the Layout.
So run the complete project and this will be the result.
Subscribe and Get Free Video Courses & Articles in your Email
Comments are closed.