In this Android Studio article we are going to learn about Creating Magic Buttons. so for creating
of Magic Button in Android Studio we are going to use third party library.
Also you can read more android development articles
1: Android Development Articles
First of all open your Android Studio , After that create New Project in Android Studio and
choose Empty Activity.
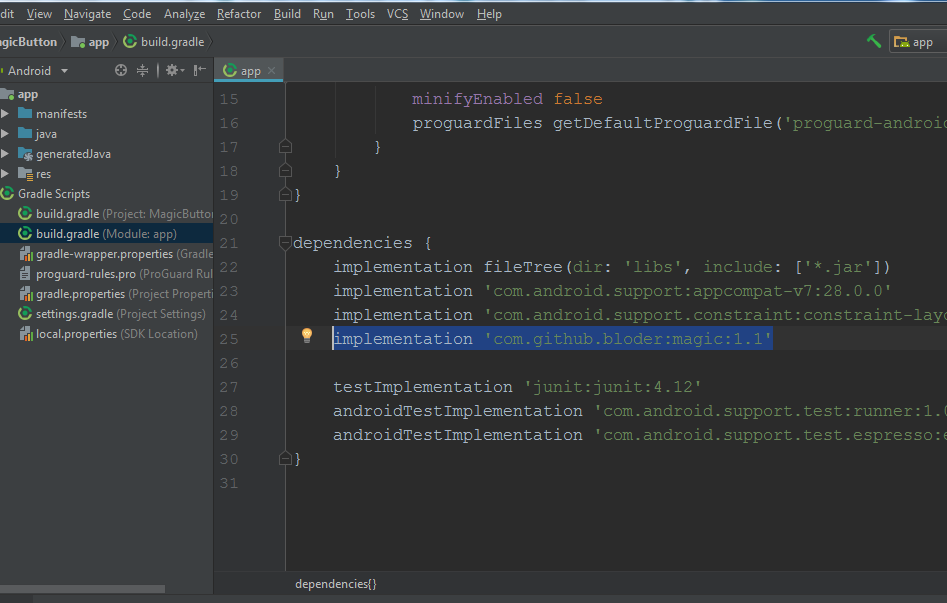
OK after creating your project in Android Studio, you need to open your build.gradle(Moduel:App)
and add this library to your Module Gradle in the dependencies section. because for creating of the
Magic Button in Android Studio we are using third party library.
|
1 |
implementation 'com.github.bloder:magic:1.1' |
When you are going to add a new module in Android Studio, you need to sync your project.
After that you need to add two icons in your drawable folder, iam using these two icons and i
have already added these icons in the drawable folder.


So after adding the icons, you need to open your Layout Folder and choose main_activity.xml
and in here we have added our two magic buttons and this is the complete design you can copy.
|
1 2 3 4 5 6 7 8 9 10 11 12 13 14 15 16 17 18 19 20 21 22 23 24 25 26 27 28 29 30 31 32 33 34 35 36 37 38 39 40 41 42 43 44 45 46 47 48 49 50 51 52 53 |
<?xml version="1.0" encoding="utf-8"?> <LinearLayout xmlns:android="http://schemas.android.com/apk/res/android" xmlns:tools="http://schemas.android.com/tools" xmlns:app="http://schemas.android.com/apk/res-auto" android:layout_width="match_parent" android:layout_height="match_parent" tools:context=".MainActivity" android:orientation="vertical" > <br.com.bloder.magic.view.MagicButton android:layout_height="wrap_content" android:layout_width="wrap_content" android:id="@+id/mgbtn1" android:layout_marginLeft="100dp" android:layout_marginTop="100dp" app:button_icon="@drawable/facebook" app:button_icon_width="25dp" app:button_icon_height="25dp" app:hide_text="Facebook" app:icon_button_color="#365899" app:hide_text_color="@android:color/white" app:expandable_area_color="#203763" app:hide_text_size="15sp" app:magic_button_size="50dp" /> <br.com.bloder.magic.view.MagicButton android:layout_height="wrap_content" android:layout_width="wrap_content" android:id="@+id/mgbtn2" android:layout_marginLeft="100dp" android:layout_marginTop="100dp" app:button_icon="@drawable/twitter" app:button_icon_width="25dp" app:button_icon_height="25dp" app:hide_text="Twitter" app:icon_button_color="#ced0d4" app:hide_text_color="@android:color/white" app:expandable_area_color="#2f83de" app:hide_text_size="15sp" app:magic_button_size="50dp" /> </LinearLayout> |
At the top of the design these are the two magic button for Twitter and Facebook.
|
1 2 3 4 5 6 7 8 9 10 11 12 13 14 15 16 17 18 19 20 21 22 23 24 25 26 27 28 29 30 31 32 33 34 35 36 37 38 |
<br.com.bloder.magic.view.MagicButton android:layout_height="wrap_content" android:layout_width="wrap_content" android:id="@+id/mgbtn1" android:layout_marginLeft="100dp" android:layout_marginTop="100dp" app:button_icon="@drawable/facebook" app:button_icon_width="25dp" app:button_icon_height="25dp" app:hide_text="Facebook" app:icon_button_color="#365899" app:hide_text_color="@android:color/white" app:expandable_area_color="#203763" app:hide_text_size="15sp" app:magic_button_size="50dp" /> <br.com.bloder.magic.view.MagicButton android:layout_height="wrap_content" android:layout_width="wrap_content" android:id="@+id/mgbtn2" android:layout_marginLeft="100dp" android:layout_marginTop="100dp" app:button_icon="@drawable/twitter" app:button_icon_width="25dp" app:button_icon_height="25dp" app:hide_text="Twitter" app:icon_button_color="#ced0d4" app:hide_text_color="@android:color/white" app:expandable_area_color="#2f83de" app:hide_text_size="15sp" app:magic_button_size="50dp" /> |
So run your complete project in Android Studio and this will be the result
Also you can watch the complete video for this article
Subscribe and Get Free Video Courses & Articles in your Email

Comments are closed.