In this Android Studio tutorial we are going to learn Create Custom Spinner in Android,
according to Android documentation Spinners provide a quick way to select one value from
a set. In the default state, a spinner shows its currently selected value. Touching the spinner
displays a dropdown menu with all other available values, from which the user can select a
new one.
Also you can read more android development articles
1: Android Development Articles
Learn How to Create Notification Badge in Android Studio.
So first of all you need to open your Android Studio and create a New Project, after that choose
your API Level for this article iam using API Level 22.
In the second step you need to just drag and drop Spinner widget in Android Studio, for the
purpose of this article we are using constraint layout, make sure that you have done the
constraint connections.
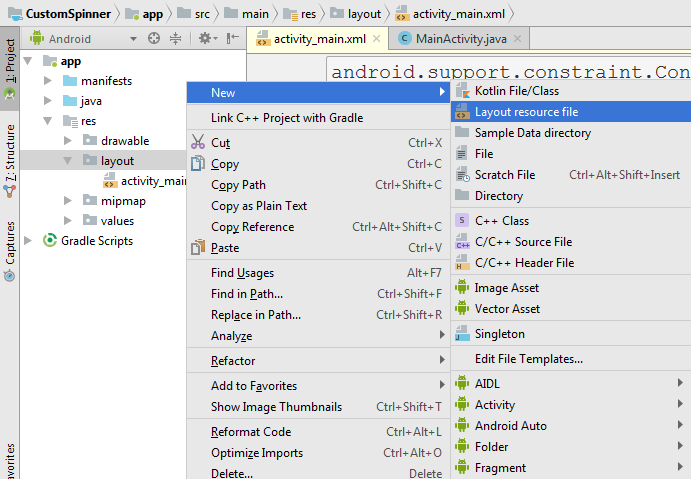
Because we are using a custom layout for our Spinner, so for this you need to create a new layout,
right click on your layout folder, and create Layout resource file like this. iam going name it
spinner_layout.xml.

We are going to just add a TextView in our this file, also iam using LinearLayout for this.
so this is the complete code for spinner_layout.xml.
|
1 2 3 4 5 6 7 8 9 10 11 12 13 14 15 16 17 |
<?xml version="1.0" encoding="utf-8"?> <LinearLayout xmlns:android="http://schemas.android.com/apk/res/android" android:layout_width="match_parent" android:orientation="vertical" android:layout_height="match_parent"> <TextView android:id="@+id/textView" android:layout_width="wrap_content" android:layout_height="wrap_content" android:layout_weight="1" android:textAppearance="?android:textAppearanceLarge" android:layout_gravity="center_horizontal" android:text="Example" /> </LinearLayout> |
Now we are going to create a new Java class, iam going to name it SpinnerAdapter.java.
this class extends from BaseAdapter, and after that you need to implement the interface for
this class. basically we are going to create three variables, and after that you need to create
constructor for your class, you can press alt+insert to create constructor in Android Studio.
|
1 2 3 4 5 6 7 8 9 10 11 12 13 14 15 16 17 18 19 20 21 22 23 24 25 26 27 28 29 30 31 32 33 34 35 36 37 38 39 40 41 42 43 44 45 46 47 48 49 50 51 52 53 54 55 56 57 58 59 60 61 62 63 64 65 |
package org.codeloop.parwiz.customspinner; import android.app.Activity; import android.content.Context; import android.view.LayoutInflater; import android.view.View; import android.view.ViewGroup; import android.widget.BaseAdapter; import android.widget.TextView; import java.util.List; /** * Created by Parwiz on 7/28/2020. */ public class SpinnerAdapter extends BaseAdapter { //our variables private List<String> listItem; private Activity activity; private LayoutInflater inflater; // constrcutor for the class, press alt+insert for creating //constrcutor public SpinnerAdapter(List<String> listItem, Activity activity) { this.listItem = listItem; this.activity = activity; this.inflater = (LayoutInflater) activity.getSystemService(Context.LAYOUT_INFLATER_SERVICE); } @Override public int getCount() { return listItem.size(); } @Override public Object getItem(int i) { return i; } @Override public long getItemId(int i) { return i; } @Override public View getView(int i, View view, ViewGroup viewGroup) { //we have inflated the layout in here View v = view; if(view == null) v = inflater.inflate(R.layout.spinner_layout, null); TextView tv = v.findViewById(R.id.textView); tv.setText(listItem.get(i)); return v; } } |
This is our MainActivity.java class. we have created the object of our SpinnerAdapter class.
|
1 2 3 4 5 6 7 8 9 10 11 12 13 14 15 16 17 18 19 20 21 22 23 24 25 26 27 28 29 30 31 32 33 |
package org.codeloop.parwiz.customspinner; import android.support.v7.app.AppCompatActivity; import android.os.Bundle; import android.widget.Spinner; import java.util.ArrayList; import java.util.List; public class MainActivity extends AppCompatActivity { List<String> listData = new ArrayList<>(); @Override protected void onCreate(Bundle savedInstanceState) { super.onCreate(savedInstanceState); setContentView(R.layout.activity_main); createList(); Spinner spinner = findViewById(R.id.spinner); SpinnerAdapter adapter = new SpinnerAdapter(listData, MainActivity.this); spinner.setAdapter(adapter); } private void createList() { for(int i = 0; i <10; i++) { listData.add("Item"+ i); } } } |
In our main_activity.xml we have just added a Spinner widget.
|
1 2 3 4 5 6 7 8 9 10 11 12 13 14 15 16 17 18 19 20 21 |
<?xml version="1.0" encoding="utf-8"?> <android.support.constraint.ConstraintLayout xmlns:android="http://schemas.android.com/apk/res/android" xmlns:app="http://schemas.android.com/apk/res-auto" xmlns:tools="http://schemas.android.com/tools" android:layout_width="match_parent" android:layout_height="match_parent" tools:context="org.codeloop.parwiz.customspinner.MainActivity"> <Spinner android:id="@+id/spinner" android:layout_width="368dp" android:layout_height="wrap_content" android:layout_marginEnd="8dp" android:layout_marginStart="8dp" android:layout_marginTop="68dp" app:layout_constraintEnd_toEndOf="parent" app:layout_constraintHorizontal_bias="0.0" app:layout_constraintStart_toStartOf="parent" app:layout_constraintTop_toTopOf="parent" /> </android.support.constraint.ConstraintLayout> |
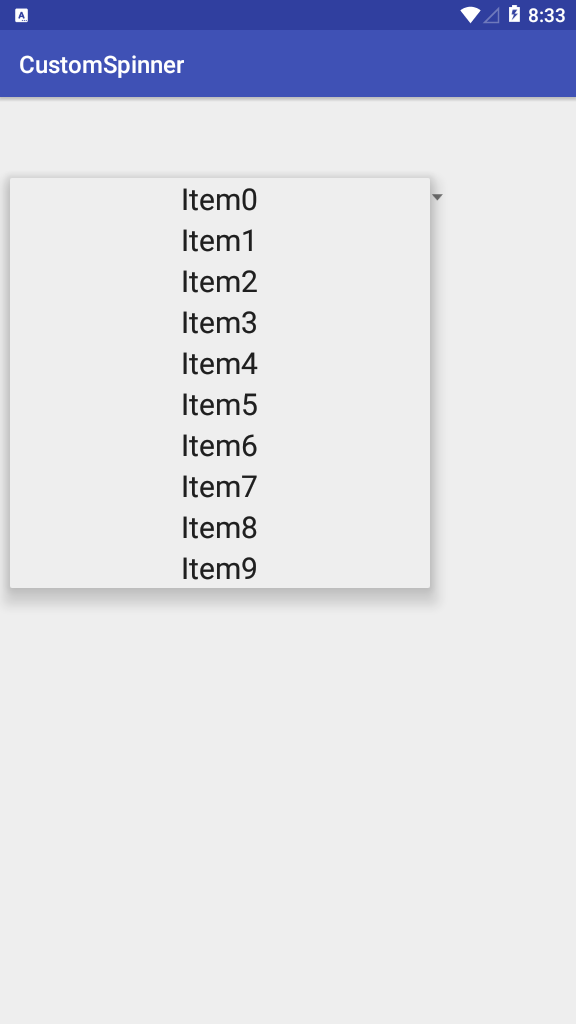
Run the complete project and this will be the result.

Subscribe and Get Free Video Courses & Articles in your Email
Comments are closed.